I love a good gallery wall. I would have one in every room in my house if I could! I think there’s just something about a gallery wall that brings a room together and adds a bit of personality to a space. It’s also an excellent way to fill up large walls or strange room space (like my living room/dining room combo). I’m by no means a professional designer, but I have had several friends compliment the gallery wall in our living room and ask me for tips on creating their own, so I figured I’d put them all in writing!
What Type?
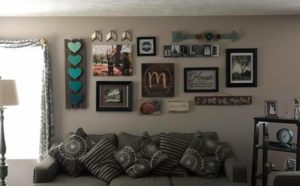
The first step of putting together a Gallery Wall is to decide what type of Gallery Wall you want. You have to decide if you’d like a more linear type of layout or an eclectic arrangement. Do you want all pictures or a mix of types of wall art? Do you want to use all personal pictures or a mix of pictures and art? For the gallery wall in my living room, we went with a mix of personal pictures and wall art with an eclectic layout.
Where to Shop?
Once you’ve figured out the type of art you’re going to use, don’t feel like you have to run out and fill the wall up right away. It took me a good 18 months to love my gallery wall. I started with five or six foundation pieces that I knew had to be up on the wall, and then I added pictures and other things here and there until I was happy with it.
I’ve found pieces everywhere from Hobby Lobby to Etsy! Sometimes, I’ve changed the entire wall based on a new picture I found when I was at the store. I’ve gone into Target looking for something specific and other times I’ve just happened across the perfect thing that I didn’t know was missing from my wall!

Get to Building
Before you start nailing holes in the wall, it’s important to have an idea of where you want things and how they’ll look in that space. I achieved this by first planning my layout on the floor and then using magazine pages or newspaper pages and cutting them to the size of the piece I was planning to hang and tape them to the wall. Once you are happy with the layout, use chalk to draw lines as your guides for where to put the nails. (If you’re planning on painting your wall eventually, you don’t even have to wipe off the chalk marks.)
Now it’s time to start hanging your art on the wall. As you find pieces that you want to add to the wall, you can rearrange your current pieces to make them work. You never know where you’ll come across the perfect piece. I’ve found parts of my gallery wall at Hobby Lobby, at craft fairs, and a few pieces were wedding or birthday gifts.
The best thing about a gallery wall is that you can always change it. I think my wall has changed at least five times since I started it, and if I find a piece I just love, I’m willing to change it again!